This posts shows how I setup a new Ubuntu for Data Science.
Update Ubuntu
1sudo apt update
2sudo apt upgrade
Configure apt
It’s always a good idea to check the baseline setup. So, let’s check the current apt keys.
1sudo apt-key list
Then, let’s check the sources.
1cat /etc/apt/sources.list
2cd /etc/apt/sources.list.d/
And finally, let’s check the users and group.
 1cut -d: -f1 /etc/passwd # will list all local users
 2cat /etc/passwd # will list all local users with groups and other properties
 3getent passwd # same as above
 4
 5cut -d: -f1 /etc/group # will list all local groups
 6cat /etc/group # will list all local groups
 7id -Gn
 8groups
 9
10getent group groupname # will list all members of groupaname
11id username # will list all the groups a particular username belongs to
Configure Unity
To get minimise window on clicking its icon:
1gsettings set org.compiz.unityshell:/org/compiz/profiles/unity/plugins/unityshell/ launcher-minimize-window true
Change folder view as tree
1Files Preferences > Display > Navigate folders in a tree
Install git
1sudo apt install git
Configure git
1git config --global user.name "userName"
2git config --global user.email "email@mailprovider.com"
3git config --global core.excludesfile '~/.gitignore'
Connect to GitHub using a SSH key
1mkdir ~/.ssh #if it does not already exist
2chmod 700 ~/.ssh
3cd ~/.ssh
4ssh-keygen -t rsa -C "email@mailprovider.com"
5enter a keyname
6enter a passphrase
7cat ~/.ssh/keyname.pub
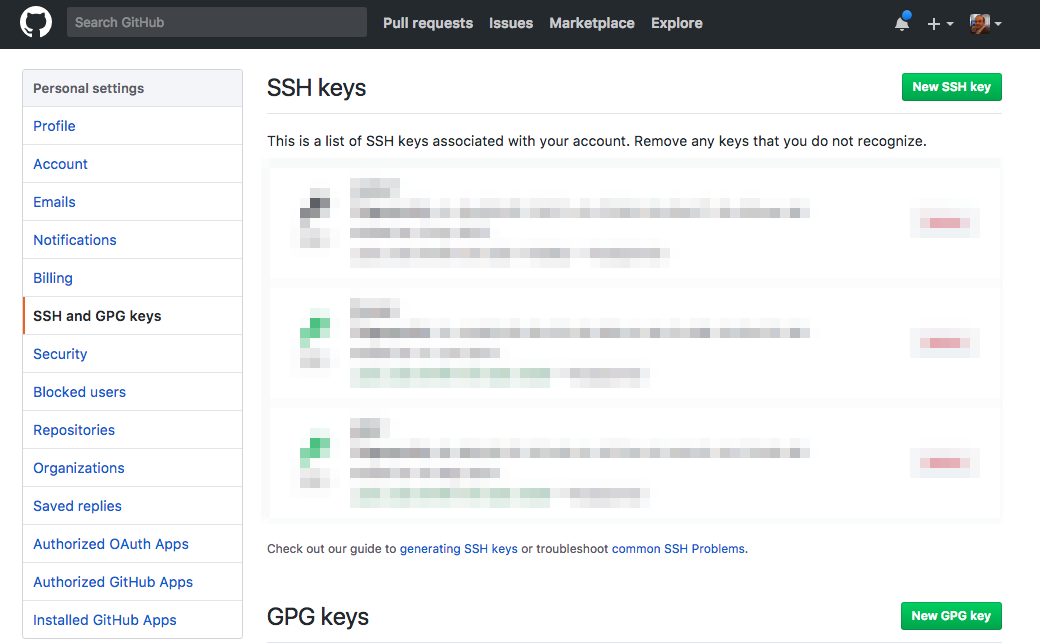
Copy the key to GitHub. Go to GitHub Settings. From the left margin, choose SSH and GPG keys and click on New SSH key. Paste the value copied above and give the key a name.
1eval `ssh-agent -s` # if needed
2ssh-add ~/.ssh/KEYNAME
Connect to external servers using SSH keys
1mkdir ~/.ssh #if it does not already exist
2chmod 700 ~/.ssh
3cd ~/.ssh
4ssh-keygen -t rsa
5enter a keyname
6enter a passphrase
7ssh-copy-id -i [path to rsa file] USER@SERVER
Install SSHFS
SSHFS allows you to mount a remote filesystem using SFTP.
1sudo apt install sshfs
Create a mounting point
1sudo sshfs USER@SERVER:/ /mnt/foo/ -o allow_other,IdentityFile=/home/USER/.ssh/SERVER_rsa
Disconnect a mounting point
1sudo umount /mnt/foo
or to mount the drivers without sudo everytime
using an admin account
1sudo chown firas: /mnt/foo/
Then using your account
1chmod 700 foo
Now, you can do
1sshfs USER@SERVER:/ /mnt/foo -o IdentityFile=/home/USER/.ssh/SERVER_rsa
Keeping allow_other will cause the error: fusermount: option allow_other only allowed if 'user_allow_other' is set in /etc/fuse.conf
Install CIFS
1sudo apt-get install cifs-utils
To mount windows share (SMB) as local disk:
1id
2sudo mount //WINSRV/SHARE -t cifs -o uid=1000,gid=1000,username=USER,domain=DOMAIN /mnt/foo
3sudo mount -t  cifs //WINSRV/SHARE ~/localmount -o user=userid,pass=mypass,cache=loose,noperm,dir_mode=0777,file_mode=0777
Install Remmina
1sudo apt-add-repository ppa:remmina-ppa-team/remmina-next
2sudo apt update
3sudo apt install remmina remmina-plugin-rdp libfreerdp-plugins-standard
Configure Terminal
 1  /* 8 normal colors */
 2  [0] = "#2f1e2e", /* black   */
 3  [1] = "#ef6155", /* red     */
 4  [2] = "#48b685", /* green   */
 5  [3] = "#fec418", /* yellow  */
 6  [4] = "#06b6ef", /* blue    */
 7  [5] = "#815ba4", /* magenta */
 8  [6] = "#5bc4bf", /* cyan    */
 9  [7] = "#a39e9b", /* white   */
10
11  /* 8 bright colors */
12  [8]  = "#776e71", /* black   */
13  [9]  = "#ef6155", /* red     */
14  [10] = "#48b685", /* green   */
15  [11] = "#fec418", /* yellow  */
16  [12] = "#06b6ef", /* blue    */
17  [13] = "#815ba4", /* magenta */
18  [14] = "#5bc4bf", /* cyan    */
19  [15] = "#e7e9db", /* white   */
20
21  /* special colors */
22  [256] = "#2f1e2e", /* background */
23  [257] = "#a39e9b", /* foreground */
Install zsh and prezto
1sudo apt update
2sudo apt install zsh
3chsh -s $(which zsh) # to change to zsh, don't use sudo otherwise it will change it for root
4sudo vi /etc/passwd # just to check that now :/home/USERNAME:/usr/bin/zsh
5# logout and login
6git clone --recursive https://github.com/sorin-ionescu/prezto.git "${ZDOTDIR:-$HOME}/.zprezto"
Configure prezto
1cd ~
2ln -s .zprezto/runcoms/z* .
3mv zlogin .zlogin
4mv zlogout .zlogout
5mv zpreztorc .zpreztorc
6mv zprofile .zprofile
7mv zshenv .zshenv
8mv zshrc .zshrc
Prezto has many useful modules and here is a list of all modules available. You can edit .zpreztorc to enable any of them:
 1# Set the Prezto modules to load (browse modules).
 2# The order matters.
 3zstyle ':prezto:load' pmodule \
 4  'environment' \
 5  'terminal' \
 6  'editor' \
 7  'history' \
 8  'directory' \
 9  'spectrum' \
10  'utility' \
11  'completion' \
12  'git' \
13  'archive' \
14  'osx' \
15  'python' \
16  'ruby' \
17  'fasd' \
18  'autosuggestions' \
19  'command-not-found' \
20  'dnf' \
21  'dpkg' \
22  'emacs' \
23  'gnu-utility' \
24  'gpg' \
25  'haskell' \
26  'helper' \
27  'homebrew' \
28  'macports' \
29  'node' \
30  'ocaml' \
31  'pacman' \
32  'perl' \
33  'rails' \
34  'rsync' \
35  'screen' \
36  'ssh' \
37  'tmux' \
38  'wakeonlan' \
39  'yum' \
40  'syntax-highlighting' \
41  'history-substring-search' \
42  'prompt'
Install R and RStudio
- To get the most updated version of R, add CRAN repository
1sudo apt-key adv --keyserver keyserver.ubuntu.com --recv-keys E298A3A825C0D65DFD57CBB651716619E084DAB9
2sudo add-apt-repository 'deb [arch=amd64,i386] https://cran.rstudio.com/bin/linux/ubuntu xenial/'
3sudo apt update
4sudo apt install r-base
5sudo apt install r-base-dev
To Install Rstudio,
1sudo dpkg -i libgstreamer0.10-0_0.10.36-1.5_amd64.deb
2sudo dpkg -i libgstreamer-plugins-base0.10-0_0.10.36-2_amd64.deb
3sudo apt install libjpeg62 libedit2
4sudo dpkg -i rstudio-1.1.383-amd64.deb
Install Python virutal environment
Ubuntu 16.04 comes with Python and Python3 installed.
Install and update pip3:
1sudo apt install python3-pip
2pip3 install --upgrade pip setuptools wheel
Install virtualenv and virtualenvwrapper
1sudo apt install virtualenv virtualenvwrapper
Add the following lines to .zprofile:
1# needed for virtualenvwrapper
2export WORKON_HOME=$HOME/.virtualenvs
3export PROJECT_HOME=$HOME/Projects
4export VIRTUALENVWRAPPER_PYTHON=/usr/bin/python3
5export VIRTUALENVWRAPPER_VIRTUALENV=/usr/bin/virtualenv
6export PIP_REQUIRE_VIRTUALENV=true
7source /usr/local/bin/virtualenvwrapper.sh
Install Jupyter notebook
1mkproject -p `which python3` Jupyter
2pip3 install jupyter
Install Sublime Text 3
Follow the steps mentioned in the Sublime 3 Docs
Install the GPG key:
1wget -qO - https://download.sublimetext.com/sublimehq-pub.gpg | sudo apt-key add -
Ensure apt is set up to work with https sources:
1sudo apt-get install apt-transport-https
Select the channel to use:
1echo "deb https://download.sublimetext.com/ apt/stable/" | sudo tee /etc/apt/sources.list.d/sublime-text.list
Update apt sources and install Sublime Text:
1sudo apt-get update
2sudo apt-get install sublime-text
Tips:
You can start Sublime Text from the terminal using subl command.
If Sublime Text is not showing in the ‘open with’ menu, then follow these steps to fix it:
- Copy the contents of /usr/share/applications/sublime_text.desktop to ~/.local/share/applications/sublime_text.desktop
- Then in the terminal type: sudo update-desktop-database
Install Source Code Pro
Download the latest release from GitHub repo
1
2# For system wide installation, copy the fonts to `/usr/share/fonts` and run `sudo fc-cache` to rebuild the font cache,
3# For a local installation: create `~/.fonts` if not already exists, copy the font files here, then rebuild the font cache.
4
5mkdir ~/.fonts
6cd ~/.fonts
7# copy all OTF files to this directory
8cp ~/Download/*.otf ~/.fonts
9fc-cache -f -v
Install vim
1sudo apt install vim
Install SnapGene viewer
1wget http://www.snapgene.com//products/snapgene_viewer/download.php?&majorRelease=4.0&minorRelease=4.0.6&os=linux_deb
2sudo dpkg -i snapgene_viewer_4.0.6_linux.deb
3sudo apt-get install ttf-mscorefonts-installer
4fc-cache -f -v # to rebuild font cache manually
Install htop
1sudo apt install htop
Install Zotero
Download Zotero from here, and unzip the downloaded file
1tar -xvjf Zotero-5.0.21_linux-x86_64.tar.bz2
where -j is equal to --bzip2. Rename the folder and move it to /opt/.
To create a shortcut that you can use in Unity launcher, do the following:
1cd /usr/share/applications
2sudo ln -s /opt/Zotero/zotero.desktop .
In Ubuntu 18.04 and gnome desktop:
1cd ~/Downloads
2wget https://download.zotero.org/client/release/5.0.47/Zotero-5.0.47_linux-x86_64.tar.bz2
3tar -xjvf Zotero-5.0.47_linux-x86_64.tar.bz2
4sudo mv Zotero_linux-x86_64/ /opt/zotero
5ln -s /opt/zotero/zotero.desktop ~/.local/share/applications/
Instal WPS Office
1wget http://ftp.debian.org/debian/pool/main/libp/libpng/libpng12-0_1.2.50-2+deb8u3_amd64.deb
2sudo dpkg -i libpng12-0_1.2.50-2+deb8u3_amd64.deb
3wget http://kdl1.cache.wps.com/ksodl/download/linux/a21//wps-office_10.1.0.5707-a21_amd64.deb
4sudo dpkg -i wps-office_10.1.0.5707-a21_amd64.deb
Symbol fonts
1cd /tmp
2git clone https://github.com/iamdh4/ttf-wps-fonts.git
3sudo mkdir /usr/share/fonts/wps-fonts
4sudo mv ttf-wps-fonts/* /usr/share/fonts/wps-fonts
5sudo chmod 644 /usr/share/fonts/wps-fonts/*
6sudo fc-cache -vfs
7rm -rf /tmp/ttf-wps-fonts
Install Hugo
To get the latest version of Hugo, use snap to install it.
1sudo snap install hugo
Install SNX (optional)
1sudo apt install libstdc++5:i386 libpam0g:i386 libx11-6:i386
2sh +x checkpoint vpn snx linux 800007075
Tips
- To open the directory from terminal
1nautilus . &
2xdg-open . &
- To reset Ubuntu Desktop to its default settings
1dconf reset -f /
- To enable En-GB spell checking in LibreOffice
1sudo apt install hunspell-en-gb
- To install a better screen shot manager
Download the one that comes with Deepin distribution from here
1sudo apt install python-xlib
2sudo dpkg -i deepin-scrot_2.0-0deepin_all.deb
- To preview a log file live
1tail -f ATACseq_TimePiont_diffbind_analysis.R.log
Where -f is follow: output appended data as the file grows.
- Install a graphical system load indicator for CPU, ram, etc..
1sudo apt install indicator-multiload
Install sushi-gnome
1sudo apt-get install gnome-sushi
Install Chromioum
1sudo apt-get install chromium-browser